

How to learn photography in one hour
How to learn photography in one hour
20 minutes theory, 20 minutes practice and 20 minutes selecting

If you work in an environmental organization or a small, sustainable business, there are bound to be frequent events, products or people you want to shoot for your website, blog or social media.
With my photo tips, you'll first learn the theory, then put it into practice, and at the end review the photos you've created.
Make photos that touch emotionally from the start
You probably already know about phototechnics or have heard something about aperture, shutter speed and ISO value.
If you haven't, these tips are still for you because technique isn't that important. It sounds surprising, because after all, I can't operate my camera without reading the manual.
Beyond technology
My photography teacher at the time said to us students, when he was annoyed by our questions about what camera or shutter speed the photographer used in the photo:
"I'm not going to tell you, because it doesn't matter."
These words sound almost retrograde in our techno-focused society: gadget, gear and equipment, people love technology because it helps them.
But we can become dependent on it if we don’t control it.
Besides, there are already enough websites about photo technology from which you can get knowledge.
What really matters
The American photojournalist Henning Christoph from Essen praised me at the time and said that I did “soul photography”, that my pictures conveyed a mood that touched our souls.
The success of art is based on evoking certain feelings in the viewer, both negative and positive. If visuals do not touch us, we disregard them. If the technique is right, but not the message, then we don’t get it.
That doesn't mean you can't shoot “soulless” photos - on the contrary, the more you practice, the better you get.
And the way to get there is to take bad photos and learn from them.

Let’s start.
20 minutes theory
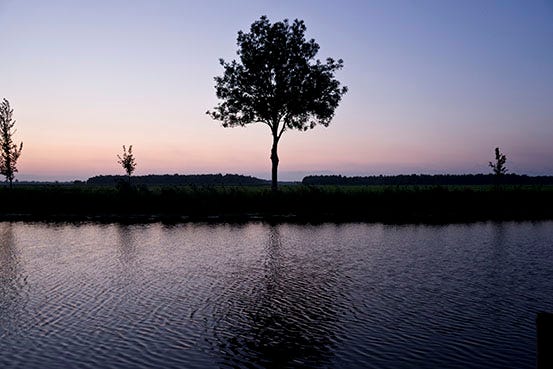
1. The Background:
Photos are two-dimensional
Everything that appears inside the rectangle (or square) will later appear on a two-dimensional surface, even if you now see it three-dimensionally in front of you. This means that the background "sticks" to the middle ground, which in turn sticks to the foreground.
Everything in the background works with the foreground object as one unit. The person you photograph in front of a trashy background might appear “trashy". An object in front of a cluttered background looks cluttered.
Therefore, the way you compose your shot is crucial: where do you place the person or object on the surface? How do you compose all the other things from the environment behind or in front of your object?


Background Tips:
Create clarity in the background, don't let a palm tree grow out of the head of your photographed person, have a clear area outlining the face or figures
This works best if you either move the person or subject far enough away from the background or use an open aperture to create a blurry background
Learn to divide our three-dimensional world into two-dimensional surfaces and to weigh which surfaces fit together visually
Arrange all objects on the area in a "harmonic chaos", that is asymmetrically, but deliberately arranged
To create a dynamic, bring small and large objects, light and dark, smooth and rough, angular and round, pale and strong, colored and grayscale together


Learning to think in areas


2. The Frame
Everything that shows up inside the frame is important (oh really…)
In other words, look closely at what is happening inside the rectangle and move away from distracting subjects or wait until the distracting element, such as passerbys, moves out of your frame. Try to learn a wide-angle view by noticing everything that happens in the corner of your eye, which is the viewfinder.
Keep dropping your focus from your subject and observe the whole frame. If you've done this often enough, you'll eventually get square eyes and never miss a glitch again.

Frame Tips:
Create tension with lines that go through the image and lead to an object
Symmetry is stricter than asymmetry; straight lines are calmer than diagonals
Divide the picture into three parts horizontally and vertically and place the object in one third of them, this is called the rule of thirds. For centuries, painters have applied this rule to their paintings, calling it the golden ratio.
Therefore, our eyes are used to the division into thirds, it’s appealing to the eye
Deviate from the rule of thirds as you gain more experience with it
Design subjects with open spaces, they give the image a room to "breathe”

Rule of thirds

3. The Light
Photography means "writing with light" - great light is the photographer's heaven.
A photo with a special light situation moves us more than a photo without it. In short the definition of light is electromagnetic radiation in a certain wavelength. Only the radiation visible to the human eye we call light.
There exist other electromagnetic wavelengths, such as radio waves or ultraviolet radiation, which are not visible to us. The light that strikes an object is measured in units of lux. This is also referred to as illuminance.
There are different color temperatures of light: We perceive a green-blue fluorescent tube cooler than a reddish sunset. This difference in color temperature is measured in Kelvin.

The way you handle photographic technology rises and falls with the way you handle the light that falls onto your camera, which is called exposure.
In other words: You need to know how your camera reacts to what light at what setting. This means becoming an expert at controlling exposure. With a SLR camera, it's best to set it to manual mode so you can influence how the camera responds.
Midday sun creates harsh shadows and the light looks flat, in the early morning and evening it appears soft and magical. Then blue and orange tones mix and shadows become longer. An overcast sky, like a softbox, also brings soft shadows during the day.
Light Tips:
At any time of day, observe the sunlight and artificial light in your environment and think about when you find it pleasant or exciting
Observe how the light visually changes the object in front of you: Is it modulated? Does it shine through or do you see the rays of the light source behind the object?
Always have your camera with you to capture these situations
You rarely need a flash, as long as you know how to use natural light. But if you do want to use an external light, set it so that no one can recognize it as a flash
High ISO value, open aperture and longer shutter speed = letting in more of light. Low ISO value, closed aperture, shorter shutter speed = letting in less of light. Make sure all three components are coordinated
For budding professionals: photograph lighting situations where all types of light such as artificial, sunlight, and flash are present at the same time
4. The Eye
If you understand how our vision works, you’ll be able to improve your skills
The human eye has a certain angle of vision, it is approximately at an angle of a 50mm lens, a normal lens. So we don't see like with a telephoto lens nor with a wide angle.
The normal lens on the camera is convenient for beginners, because you can shoot everything with it: Portraits, reports, products and landscapes. With this lens, you don't have to worry about changing the focal length, i.e. zooming or changing the lens - instead you keep the attention on your subject.
However, the eye sees much better than a camera, because it has a wider contrast range. Once the eye perceives areas that have both strong sun and harsh cast shadows, the eye balances it out and sees fine details in the shadow and light areas.
The camera with it’s memory card that is sensitive to the light, cannot do that.
It has a lower contrast range: dark shadows look black without details and the light areas look as if they have been "eroded", if you choose a wrong adjustment. These areas no longer contain any information, i.e. pixel areas that represent color tones.
Eye Tips:
Don't use a zoom function, use only a single angle lens or one zoom setting on your phone. As soon as you are not standing optimally, move towards your subject. This golden tip will give you more dynamic and exciting photos than you would ever take with a zoom
Use a zoom lens if you shoot regularly: you keep moving, but you've learned not to zoom back and forth like crazy
When taking photos, pay attention to contrast: is it as you saw it in the photo or different? Are the shadows hard or soft; do you still have shading in the shadow area?
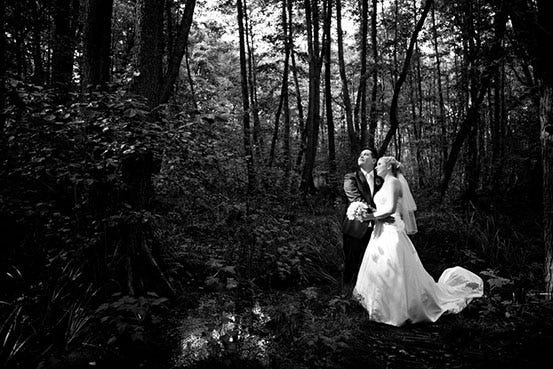
5. The Soul
It takes practice to take good photos
There are no explanatory words in a picture, it is the moment of a split second that makes a good work.
It is the mood that you feel and that makes you get closer to your subject, it is a small event that expresses a symbol of the big picture.
If you think that a subject is worth shooting and the light is harmonious* together with the colors and the design in the frame, then it transmits a character that the viewer can sympathize with even though she has not been there.

Being present as a photographer plays a big role: a photo will make the viewer get bored if it was shot from five meters away. Unless you're an animal photographer - of course it's better not to disturb the animals and to use a telephoto lens.
Robert Capa, a Hungarian-American war reporter of the photo group Magnum, said:
"If your pictures aren't good enough, you're not close enough."
Therefore it is important to completely immerse oneself in the surroundings, to mingle with the people and to shoot until one has captured the decisive moment.
Until you convey a message to the viewer.
Henry Cartier Bresson founded the concept of the decisive moment, which names the unity of all forms and the aestethic expression in the moment of pressing the trigger. This is how an excellent photo would be created.
*By harmonious I mean an alternation between calm and dynamic, a certain rhythm that captivates the viewer
Soul Tips:
While taking pictures, ask yourself what is happening and how is the mood?
Continue to ask yourself what underlying message you can show and feelings you want to convey
These questions take you beyond the surface to a deeper recognition of the scene and an expression that tells a story
Especially with reportage photography at an event, it's important to have a common thread and tell a story with a beginning, a climax, and a closing section
What do you want to express? Show your side of the event or situation
20 minutes practice
7 steps to follow
Think about a genre such as landscape photography, portrait or reportage photography that you would like to try.
Choose a suitable subject: A farmer’s market, a person portrayed or a national park. You can find inspiration in the examples below.
Decide when you will start shooting and make an appointment if necessary.
Take any camera you like (even your cell phone camera will do) and make sure the battery is charged.
Follow the above mentioned rules or take a note about it with you to the appointment.
Before you press the trigger, think about why you want to photograph the theme: find a balance between a frantic click of the trigger and a thoughtful way of shooting.
Focus completely on taking pictures and nothing else for 20 minutes.
Sample Exercises:
Shoot a local event. Be aware of privacy rights: Ask people beforehand if you can take their picture. Tell them that the pictures are private and will not be published or where you might publish them
Take a portrait of a friend, outside in the city or in the country
Take landscape photos of your surroundings
Depict an item photographically (still life)
Take an animal photo, for example in an animal garden or of your pet
Take a photo of a building of your choice (architecture)

20 minutes of photo selecting
You’ll get very fast at it the more you select
When you look at your shots on the screen, you will see which ones you like and which ones you don't. Choose a maximum of five to ten images to shortlist.
As a photographer, it's important to learn how to select because in today's digital age, we're faced with piles of photos on all sorts of hard drives and memory cards from various devices.
That's where it helps if you keep track. The more you practice selecting images, the less overwhelmed you'll be by the number of photos on your memory card.
The basic photo editing is correcting brightness, contrast and colour value, with these easy corrections your photos will look much better. I recommend learning digital photo editing, but this topic is for another post.
As a photographer, the thing that helped me the most was to look at the images of professional photographers and study them for the components mentioned above. During my traineeship in a photojournalistic agency, I had to sift through and label thousands of slides with motifs from all over the world - the best practice.
Selection Tips:
Look at images on the internet from photographers similar to your favorite genre. So if you've done a portrait in a room, learn from the portraits in similar settings
Go to photo exhibitions regularly
Balance out the brightness and see if your photo is too contrasty. If the photo is too yellowish try to increase a bluer value, if it’s too magenta increase the green value
The world is full of photos - look at them all and judge which ones are good or bad or which ones you like: Advertising photos, posters, postcards, pictures in newspapers and magazines, book titles, on social media, etc.
One last thing: Allow yourself to take bad photos! Don’t be shy, you can delete them afterwards and everyone will only ever see your masterpieces.
I hope you enjoyed this little photo (ex)course! Feel free to tell me about your experience of how my tips have helped you (if so) in the comments, thanks.
Share this post with someone who might need help in this:
Further reading about the basics of photography:
https://www.bhphotovideo.com/explora/
All photos and graphics by Benja Weller, cat-graphic via Canva.com
Translated with the help of www.DeepL.com/Translator (free version)